
This project is something I’ve been meaning to try for some time, but have at last got round to doing so. It is a culmination of many other things I have done with Sonic Pi, especially following the introduction of OSC messaging added to Sonic Pi 3.I have done several projects interfacing hardware devices such as push buttons, and a ps3 games controller to Sonic Pi. These heve used python to interface to the hardware, and I have completed the link to Sonic Pi by utilising the python-osc library using it to send signals generated by the hardware to Sonic Pi in the form of OSC messages.
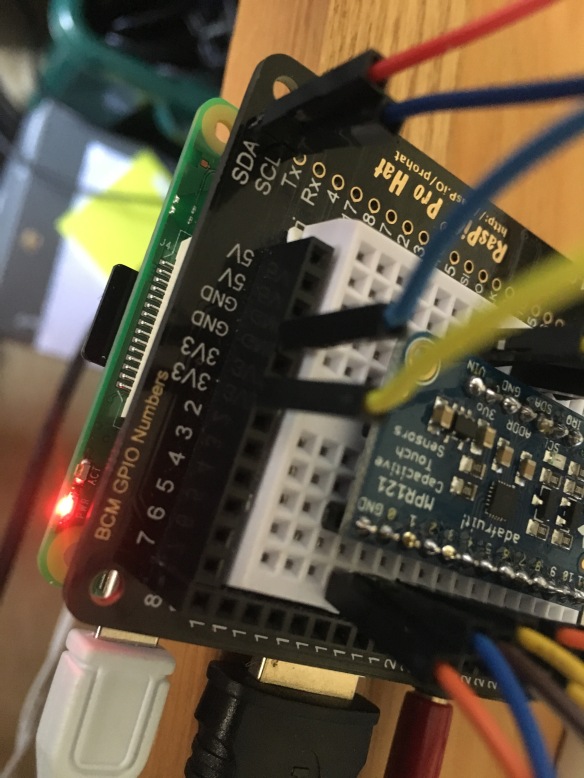
I was attracted by Adafruit’s MPR121 12 channel capacitive input board which was available from the PiHut for £8, and which had good documentation supporting it on the Adafruit Site. The documentation shows you how to mount the board on a breadboard, and connect it to a raspberry pi. I used both a Pizero, and a Pi3, as it is possible to use the software I developed to connect either to a local copy of Sonic Pi (running on a Pi3) or to a remote copy of Sonic Pi on a different device, in which case the Pizero may be more appropriate and is certainly cheaper. A small amount of soldering is required to mount the header pins on the board, but this is not too difficult to do. There is a separate PiHat version of the board for £15, if you want to mount it directly on the Pi. In fact I used the standalone board and mounted it on a Rasp.iO ProHat that I already had, which made it very easy to wire things up. I used a 63 row breadboard to make a 12 key “keyboard”
I followed the instructions from Adafruit to install their library, but I modified things slightly so that I could use it with python3 which is required for the python-osc library.
I installed on the latest stretch raspbian, using the following steps:
(First open a terminal window)
sudo apt-get update
sudo apt-get install build-essential python3-dev python3-smbus python3-pip git
cd ~
git clone https://github.com/adfruit/Adafruit_Python_MPR121
sudo python3 setup.py install
Notes: I think all of the install packages in the second line should already be there, but this shows what is needed, and there is no harm in using the line to check
In the Adafruit documentation a problem is flagged concerning the driver for the i2c system. You should install the workaround as specified by editing the config.txt file in the boot partiti
sudo nano /boot/config.txt
Scroll to the bottom of the file and add the line:
dtoverlay=i2c-bcm2708
The exit the editor using ctrl+X selecting to save the changes in the file.
You should make sure that i2c is enabled in the Raspberry Pi Confugration. Either use the utility under Preferences on the main window in the Desktop, or from the terminal run
sudo raspi-config
select number 5 Interfacing Options and enable I2C. Also, make sure that your boot option boots to the Desktop, the default setup.
Now reboot the Raspberry Pi so that the changed boot options take effect.
The Hardware
The Adafruit documentation has several screens, or you can download a pdf. The Hardware Page shows the connections between the Pi GPIO pins and the MPR121 board schematically. I used a Rasp.iO ProHat board plugged into a Pi3. This board contains a small embedded breadboard large enough to plug in the MPR121 board, and it also has all the GPIO pins arranged in numerical order, making it easy to make the connections uinsg male to male jumper leads. I used 5 of these to connect the 3v3, GND, SCL and SDA pins as specified, and also the IRQ pin to GPIO pin 26, used in one of the Adafruit example files Raspberry Pi virtual keyboard (to which I made some modifications to it would work on Python3), although that is not part of the full project I develop below, so you can miss it out if you wish. The two pictures below shows these connections.
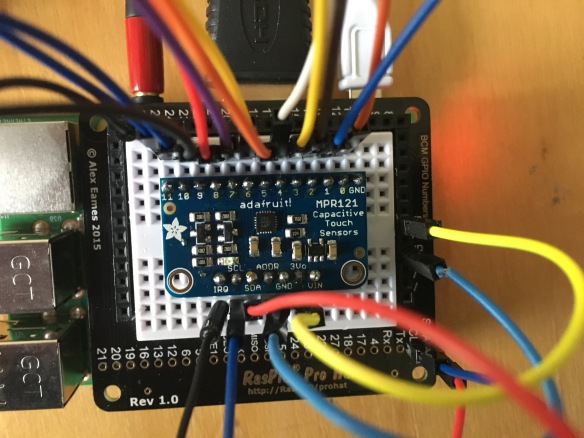
The twelve capacitative inputs are on the over side of the MPR121 board, and I connected each of these using slightly longer male to male jumper leads to a 63 column breadboard, and used short wire links to produce the input “keys”.
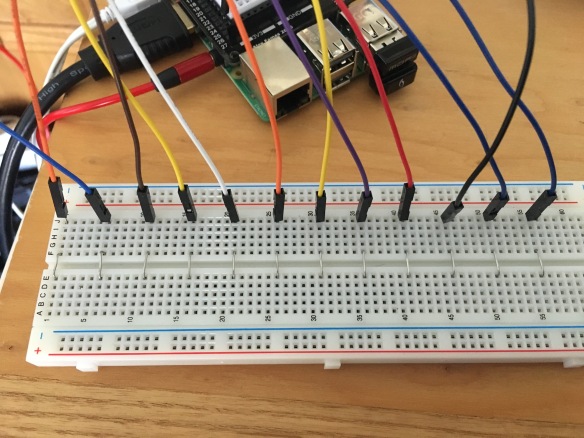
This is only one way to make an input “device” but I found it worked well in practice. If you wish you could make something with slightly larger keys, maybe using aluminium foil. Strips of this could be stuck down onto a piece of wood, and then wired back to the ProHat breadboard, but the wiring would be a little trickier to achieve.
So much for the hardware. What about the software? My main aim in doing this project was to develop a touch keyboard that could be used with Sonic Pi. However before developing the software for that, it is prudent to check the operation of the MPR121 board. Adafruit include several example files that can be utilised, but some of them will need to be modified to work under Python3. However the first one, simpletest.py will work unmodified. To try this out start a terminal and navigate to the Adafruit examples folder:
cd ~ython_MPR121/examples
sudo python3 simpletest.py
Touch and release each “key” in turn, and you should see printed output on the terminal screen like this:
0 touched!
0 released!
1 touched!
1 released!
...
...
11 touched!
11 released!
You can stop the program running by typing ctrl+C
The remaining two example files are not required by my project, but for the sake of completeness if you want to try out the playtest.py and keyboard.py files you need to modify them slightly. Otherwise you can ignore the following section, and move onto the section describing the software I developed.
for playtest.py file make the following changes:
change line 30 from
print 'Adafruit MPR121 Capacitance Touch Audio Player Test'
to
print('Adafruit MPR121 Capacitance Touch Audio Player Test')
Also change line 89 from
for key, soundfile in SOUND_MAPPING.iteritems():
to
for key, soundfile in SOUND_MAPPING.items():
I did this and saved the new version as playtest3.py. You can then try it out using
sudo python3 playtest3.py
For the file keyboard.py change line 136 from
for pin, key in KEY_MAPPING.iteritems():
to
for pin, key in KEY_MAPPING.items():
also, in the requirements for the file listed at the top it states:
sudo apt-get install build-essential python-dev python-pip libudev-dev
sudo pip install python-uinput
These should be changed (and acted upon) to:
sudo apt-get install build-essential python3-dev python-pip3 libudev-dev
sudo pip3 install python-uinput
You should have already installed the Adafruit library for python3, and when you run the keyboard script you should use
sudo python3 keyboard3.py
I renamed the altered file to keyboard3.py
Using the Adafruit MPR121 with Sonic Pi.
We have seen in the simpletest.py script that the MPR121 board can detect keypresses and print the results on teh terminal screen. How do we interface this to Sonic Pi? The intermediate “glue” is to make use of OSC (Open Sound Control) messages. These can be generated using an add-on python library, and version 3 and upwards of Sonic Pi can detect them, and then utilise them to control a program running in Sonic Pi.
The Python library I utilise is called python-osc. This can be installed using the command below, which currently gives version 1.6.6 (Note there is a bug in version 1.6.5)
sudo pip3 install python-osc
I developed a script based on Adafruit’s simpletest.py script to which I added the extra code to enable OSC support, and to add message sedning of the state of each “touch key” when it was changed. I also have a PS3 games controller, which I had previously used with OSC support, and I added support for one of the joysticks on this which I utilised in my program. The program below has the Joystick support lines commented out, but you can add them in again if you wish to use this.
#!/usr/bin/env python3

#driver for 12 pad touch keys and ps3 wireless controller by Robin Newman
#April 2018
#uses library for Adafruit MPR121 board

# Copyright (c) 2014 Adafruit Industries
# Author: Tony DiCola
#
# Permission is hereby granted, free of charge, to any person obtaining a copy
# of this software and associated documentation files (the "Software"), to deal
# in the Software without restriction, including without limitation the rights
# to use, copy, modify, merge, publish, distribute, sublicense, and/or sell
# copies of the Software, and to permit persons to whom the Software is
# furnished to do so, subject to the following conditions:
#
# The above copyright notice and this permission notice shall be included in
# all copies or substantial portions of the Software.
#
# THE SOFTWARE IS PROVIDED "AS IS", WITHOUT WARRANTY OF ANY KIND, EXPRESS OR
# IMPLIED, INCLUDING BUT NOT LIMITED TO THE WARRANTIES OF MERCHANTABILITY,
# FITNESS FOR A PARTICULAR PURPOSE AND NONINFRINGEMENT. IN NO EVENT SHALL THE
# AUTHORS OR COPYRIGHT HOLDERS BE LIABLE FOR ANY CLAIM, DAMAGES OR OTHER
# LIABILITY, WHETHER IN AN ACTION OF CONTRACT, TORT OR OTHERWISE, ARISING FROM,
# OUT OF OR IN CONNECTION WITH THE SOFTWARE OR THE USE OR OTHER DEALINGS IN
# THE SOFTWARE.
# NB Install Adafruit Library and python-osc library before use
import sys
import time
import pygame

import Adafruit_MPR121.MPR121 as MPR121

from pythonosc import osc_message_builder #add library for OSC support
from pythonosc import udp_client
import argparse
pygame.display.init()
##### uncomment next three lines to add joystick support
#pygame.joystick.init() #add support for PS3 controller
#ps3=pygame.joystick.Joystick(0)
#ps3.init()

def control(spip): #This is called once __main__ has set up the Sonic Pi ip address
    gate = 0.1 #dead area used for PS3 joysticks
    sender=udp_client.SimpleUDPClient(spip,4559) #set up OSC link to Sonic Pi


    print('Adafruit MPR121 Capacitive Touch keypads')

    # Create MPR121 instance.
    cap = MPR121.MPR121()

    # Initialize communication with MPR121 using default I2C bus of device, and
    # default I2C address (0x5A).  On BeagleBone Black will default to I2C bus 0.
    if not cap.begin():
        print('Error initializing MPR121.  Check your wiring!')
        sys.exit(1)

    # Alternatively, specify a custom I2C address such as 0x5B (ADDR tied to 3.3V),
    # 0x5C (ADDR tied to SDA), or 0x5D (ADDR tied to SCL).
    #cap.begin(address=0x5B)

    # Also you can specify an optional I2C bus with the bus keyword parameter.
    #cap.begin(busnum=1)

    pygame.init()


    # Main loop to print a message every time a pin is touched.
    print('Press Ctrl-C to quit.')
    last_touched = cap.touched()
    while True:
        try:
            ##### uncomment next section to add joystick support #############
            #pygame.event.pump()
            #rud=ps3.get_axis(3)
            #rlr=ps3.get_axis(2)

            #if abs(rud) > gate:
                #sender.send_message('/rud',-rud)
                #print("/rud, "+str(-rud))
            #if abs(rlr) > gate:
                #sender.send_message('/rlr',rlr)
                #print("/rlr, "+str(-rlr))
                ###### end of section to uncomment for joystick support ###########
            current_touched = cap.touched()
            # Check each pin's last and current state to see if it was pressed or released.
            for i in range(12):
                # Each pin is represented by a bit in the touched value.  A value of 1
                # means the pin is being touched, and 0 means it is not being touched.
                pin_bit = 1 << i
                # First check if transitioned from not touched to touched.
                if current_touched & pin_bit and not last_touched & pin_bit:
                    print('{0} touched!'.format(i))
                    print("/key"+str(i)+',1')
                    sender.send_message('/key'+str(i) ,1)
                if not current_touched & pin_bit and last_touched & pin_bit:
                    print('{0} released!'.format(i))
                    print('/key'+str(i)+',0')
                    sender.send_message('/key'+str(i) ,0)


            # Update last state and wait a short period before repeating.
            last_touched = current_touched
            time.sleep(0.1)

        except KeyboardInterrupt:
            print("\nExiting")
            sys.exit()

if __name__=="__main__":
    parser = argparse.ArgumentParser() #setup retrieving arg (if any) for --sp
    parser.add_argument("--sp",
    default="127.0.0.1", help="The ip on which Sonic Pi listens")
    args = parser.parse_args()
    spip=args.sp
    print("Sonic Pi on ip",spip)
    control(spip)
This file is saved as osckey.py and should be set to be executable using
chmod +x osckey.py
Depending upon whether you want to control Sonic Pi on the Raspberry Pi, or on a different external computer you start this file running in a terminal window using
sudo ./osckey.py
to run it on the local Raspberry Pi computer and with
sudo ./osckey.py --sp a.b.c.d
where a.b.c.d is the IP address of the computer running Sonic Pi (on a connected local network). If you now start Sonic Pi running (on the appropriate computer), then, if you touch some of the keys on the touch keyboard, you should see OSC messages showing up in the cues log on Sonic Pi.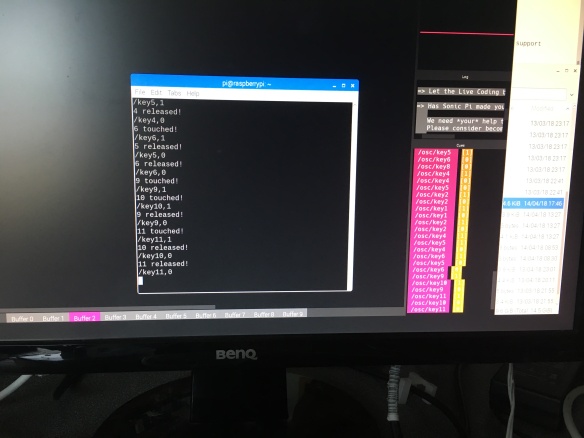
Now we can write some Sonic Pi test code to use these OSC messages.
Below is a simple test program which detects the incoming OSC messages from the keyboard and uses them to play the notes in a scale, and to allow the scale to be shifted up and down over several octaves. It also uses two keys to choose the synths to be used. Note, that when Sonic Pi receives an incoming osc message of the form /key1 it modies it to /osc/key1 This is so that it can be distiguished from cues coming in from other sources, eg midi or generated by Sonic Pi cue commands.
#Test program to receive OSC messages from touch keyboard
#written by Robin Newman, April 2018
#keys 0 to 7 olay a scale
#keys 8 and 9 shift up and down by an octave
#keys 10 and 11 choose sdiffernt synths

#the followng function detects value of wild card in osc address
define:parse_sync_address do |address|
  v= get_event(address).to_s.split(",")[6]
  if v != nil
    return v[3..-2].split("/")
  else
    return ["error"]
  end
end

use_synth :pluck #set initial synth
set :base,60 #set initial octave base note

live_loop :getkey do
  use_real_time
  b = sync "/osc/key*" #detect osc messages from ANY key using wild card *
  if b[0] == 1 #if the key has been pressed
    res = parse_sync_address "/osc/key*" #decode wild card value
    puts "Decoded address information is",res
    key = res[1][3..-1].to_i #extract key from res list and convert to integer
    puts "key pressed was",key
    if key<8 #key <8 used to play a note
      scaleOffset=[0,2,4,5,7,9,11,12]
      play note get(:base) + scaleOffset[key]
    elsif key==8 #key 8 moves down an octave
      base=get(:base)
      base=[36,base-12].max #limits minimum value of base to 36
      set :base,base
    elsif key==9 #key 9 moves up an octave
      base=get(:base)
      base=[84,base+12].min #limits max value of base to 84
      set :base,base
    elsif key==10 #key 10 chooses :pluck synth
      use_synth :pluck
    elsif key==11 #key 11 chooses :piano synth
      use_synth :piano
    end
  end
end
The live_loop :getkey is at the heart of the program. First it sets use_real_time to minimise any delay in the program responding and to give the quickest response to a key being pressed. Then it uses a sync command to wait for an incoming osc message with address “/osc/key*” This will match ANY of the keys /key1 to /key11 being pressed. It checks whether the message received is a 1, and if so (the key is pressed) it uses a function to parse the synced address and to retrieve the value of the wild card * which matched the key being pressed. The rest of the loop then uses the key number to either play a note (keys 0 to 7) or to shift the octave range (kesy 8 and 9) or to change the synth being used (keys 10 and 11). The initial base note is set to 60 but is increased or decreased in steps of 12 when keys 8 and 9 re pushed, with minimum and maximum values set to 36 and 84.
previously I had written a program called Sonic Pi Loop Controller which used TouchOSC to control Sonic Pi as shown in this video I decided to convert this to work with the touch keyboard instead. To this end, I added an extra feature to the osckey.py file enabling ot also to hadle input from a wireless PS3 games controller which I hd previously used with Sonic Pi here I cu thsi down to only look at the input from the righthand joystick on the controller. This was used to adjust the cutoff value when playing notes with the :tb303 synth (left-right movement) and to adjust the volume of the percussion loops and the tb303 synth (up down motion). The changes to the osckey.py file involved uncommenting two sections of code, the resulting file being osckeyps3.py, which I haven’t documented here, but which can be retrieved via the download link at the end of the article, as can the associated file to run on Sonic Pi which is shown below.
#Sonic Pi Loop Controller by Robin Newman
#VERSION 2 ADDS CONTROL OF BACKGROUND PULSE AND SCREEN
#THIS VERSION TESTED ON Pi3 B and Pi3 B+
#in particular uses some new :loop samples only in version 3.1
#These can be copied to the samples folder on version 3.0.1 if required
#or you can specify different ones.
#This version uses 11 push buttons on TouchOSC for input and 1 LED on TouchOSC for output
#Can be modified to use any suitable OSC source that can give on/off signals when a button is pressed
use_real_time #use_sched_ahead_time 0.2  #if problems
use_debug false
use_osc_logging false
use_osc "localhost",4559
#prime ps3 vol and cutoff
osc "/rud",0
osc "/rlr",0

use_bpm 120
path="~/Desktop/samples/"
#turn background sound off
set :bg,0

use_debug false
use_osc_logging false
#input on and off live_loops to detect inputs

define:parse_sync_address do |address|
  v= get_event(address).to_s.split(",")[6]#[address.length+1..-2].to_i
  if v != nil
    return v[3..-2].split("/")
  else
    return ["error"]
  end
end

define :toggleBG do
  b=get(:bg)
  if b==1
    set :bg,0
  else
    set :bg,1
  end
end

live_loop :pon do
  b = sync "/osc/key*"
  if b[0]==1
    r=parse_sync_address "/osc/key*"
    ns= r[1][3..-1]
    set ("c"+ns).to_sym,1
    doCommandSelect(ns .to_i)
  end
end
live_loop :poff do
  b = sync "/osc/key*"
  if b[0]==0
    r=parse_sync_address "/osc/key*"
    ns= r[1][3..-1]
    set ("c"+ns).to_sym,0
  end
end

define :doCommandSelect do |n|
  puts n
  case n
  when 0
    toggleBG
  when 1
    doLoop 1,0.5,:loop_amen,4 #parameters: channel,vol,samplename,beatstrech value
  when 2
    doLoop 2,0.5,:loop_garzul,16
  when 3
    doLoop 3,0.8,:loop_compus,16
  when 4
    doLoop 4,0.9,:loop_mehackit1,4
  when 5
    doLongNote 5,0.5,:fm,:c3,4 #parameters channel, vol,synth,note,repeat duration*****
    #*** can add an optiona beat_stretch, but probably not required
  when 6
    doLoopSequence 6,0.3,:tb303 #parameters channel, vol,synth
  when 7
    doLoop 7,0.7,:loop_mika, 16
  when 8
    doLoop 8,0.7, :loop_weirdo, 4
  when 9
    doLoop 9,0.9,:loop_safari,16 #doSingleSample
  when 10
    doLoop 10,0.7, :loop_mehackit2,4
  when 11
    doOneShot 11,4,path+"testsample.flac" #parameters channel,vol,sample
    #as a singleShot plays once so only sync the start
  else
    puts "nothing"
  end
end


#general function to set up stoppable live_loop
define :doLoop do |n,vol,sampleName,bs,|
  set ("kill"+n.to_s).to_sym,false
  ln=("name"+n.to_s).to_sym
  in_thread do
    loop do
      if get( ("c"+n.to_s).to_sym)==0
        s= get( ("s"+n.to_s).to_sym)
        kill s
        set ("kill"+n.to_s).to_sym, true
        stop
      end
      sleep 0.2
    end
  end
  live_loop  ln, sync: :metro do
    s=sample sampleName,beat_stretch: bs,amp: vol
    set ("s"+n.to_s).to_sym,s
    k=(bs/0.25).to_i
    k.times do
      sleep bs.to_f/k
      control s, amp: vol*((get "/osc/rud")[0]+1),amp_slide: 0.05
      stop if get( ("kill"++n.to_s).to_sym)
    end
  end
end

#general function to start stoppable single shot sample
define :doOneShot do |n,vol,sampleName,bs=0|
  sync :metro
  if bs >0
    s=sample sampleName,beat_stretch: bs,amp: vol
  else
    s=sample sampleName,amp: vol
  end
  in_thread do
    loop do
      if get( ("c"++n.to_s).to_sym)==0
        kill s
        stop
      end
      sleep 0.2
    end
  end
end

#general function to set up long repeating note
define :doLongNote do |n,vol,synth,note,dur|
  set ("kill"+n.to_s).to_sym,false
  ln=("name"+n.to_s).to_sym
  in_thread do
    loop do
      if get( ("c"+n.to_s).to_sym)==0
        s= get( ("s"+n.to_s).to_sym)
        control s,amp: 0,amp_slide: 0.05
        sleep 0.05
        kill s
        set ("kill"+n.to_s).to_sym, true
        stop
      end
      sleep 0.2
    end
  end
  live_loop  ln, sync: :metro do
    use_synth synth
    s=play note,sustain: dur-1,release: 1,cutoff: 100,amp: vol
    set ("s"+n.to_s).to_sym,s
    k=(dur/0.25).to_i
    k.times do
      sleep dur.to_f/k
      stop if get( ("kill"++n.to_s).to_sym)
    end
  end
end

#function to setup sequence of notes (stoppable)
define :doLoopSequence do |n,vol,synth|
  set ("kill"+n.to_s).to_sym,false
  ln=("name"+n.to_s).to_sym
  in_thread do
    loop do
      if get( ("c"+n.to_s).to_sym)==0
        set ("kill"+n.to_s).to_sym, true
        stop
      end
      sleep 0.1
    end
  end
  live_loop  ln, sync: :metro do
    use_synth synth
    co=play scale(:c3,:minor_pentatonic,num_octaves: 2).choose,release: 0.20,amp: vol*((get "/osc/rud")[0]+1),cutoff: 80#rrand_i(60,120)
    control co,cutoff: (get "/osc/rlr")[0]*40+80,cutoff_slide: 0.05,amp: vol*((get "/osc/rud")[0]+1),amp_slide: 0.05
    2.times do #do this to get a quicker response time
      sleep 0.25 / 2
      stop if get(("kill"+n.to_s).to_sym)
    end
  end
end

live_loop :metro do #metronome to sync stuff together
  sleep 1
end

#Optional repeating pulse
with_fx :gverb,room: 15,mix: 0.8,amp: 0.5 do
  live_loop :alwaysplaying,sync: :metro do #runs continuously playing
    use_synth :fm
    if get(:bg)==1
      play :c3,release: 0.9,amp: 1,pan: -0.8
      play :c4,release: 1.8,amp: 0.2,pan: -0.8
    end
    sleep 2
    if get(:bg)==1
      play :c3,release: 1.8,amp: 1,pan: 0.8
    end
    sleep 2
  end
end #fx
Note this program works even if you drive it with the osckey.py of the keyboard software, and it sets default values for the cutoff and volume values which will apply in the absence of the ps3 controller.
Both programs work OK on a Pi3. However, there is some latency, which is much reduced if you just use the Pi to send the osc messages to Sonic Pi running on a separate Mac.
I hope that these examples will inspire you to build a similar keyboard. It is not expensive to do, and, as the Sonic Pi programs show, it makes it possible to control Sonic Pi with a wide range of possibilities.
A video showing the keyboard running on a Pizero W driving Sonic Pi on a Mac is available here.
The software can be downloaded for my gist site here.
