


This project began almost by accident. I have used TouchOSC for some time now as a very convenient way of developing a virtual input (and visual output) deI have become a great fan of OSC messages as a powerful way of communicating data both to and from Sonic Pi. However there have been one or two problems which have arisen. In particular the address allocation by TouchOSC for its multitoggle and multipush switches initially made it quite difficult to use with Sonic Pi. For example, if you have say a 4×4 array of toggle switches or pushbuttons then these are addressed as follows.
/screenName/c/r
where c is the column of the matrix (numbered from left to right) and r is the row of the matrix (numbered from the top), and screenName is the name allocated by the user to the TouchSCreen. (usually this defaults to 1, which is not very informative) Thus the third switch along on the second row from the top has the address /screenName/3/2
This is fine, except that you really want to use a single live_loop to react to cues from the matrix and to decide which button has been pushed, rather than having to use a separate live_loop for every button in the matrix. Luckily Sonic Pi can support wild cards as part of the OSC address, such as in the statement:
b = sync “/osc/screenName/*/*” (Note the inclusion of the /osc before the OSC message sent by TouchOSC which is done by Sonic Pi to signify it is an external osc cue rather than say an internal live_loop cue or an external midi cue.)
This is fine, and it will respond to any of the matrix buttons being pushed, but unfortunately it doesn’t tell you which button has been pressed, even though you can see that information in the yellow cue log on the right of the Sonic Pi screen. When I first raised this as a problem with Sam Aaron as he was developing the OSC interface about a year ago last Christmas, he suggested that I might find the undocumented function get_even useful to look at. It was very useful, although it produced a rather horrendous intimidating output.
For example the live_loop below
live_loop :test do
  b= sync "/osc/screenName/multipush1/*/*"
  puts get_event "/osc/sprp/multipush1/*/*"
end
would produce output such as:
#<SonicPi::CueEvent:[[1519924660.467201, 0, #, 0, 0.0, 60.0], "/osc/sprp/multipush1/3/2", [1.0]]
You can see why Sam didn’t want to publicise this function because it hardly the sort of output a nine year old might want to come across! However you will also notice that it includes the full osc address from which we can work out which switch was pressed.
Previously I had hacked together functions to extract this date, which had all been different depending on the actual switch used. For example in a multitoggle switch with just one row there would only be one wild card, as the row would always be one. I decided it was time to produce a more rational and reusable function to extract the desired information. IN fact it wasn’t too difficult to achieve, and I ended up with the function below.
define :parse_sync_address do |address|
  v= get_event(address).to_s.split(",")[6]
  if v != nil
    return v[3..-2].split("/")
  else
    return ["error"]
  end
end
I called it parse_sync_address, and it works for any received cue, whether osc or midi. Basically it extracts the address part of the cue using some string handling functions from Ruby, and it returns a list of elements where each element is one part of the address. Thus /osc/screenName/*/* might return a list [“osc”,”screen”,”1″,”2″] Thus a modified live_loop could return information about which switch element was pushed as shown below:
live_loop :tester do
  b = sync "/osc/sprp/multipush1/*/*"
  if b[0]==1 #pushed
    res= parse_sync_address "/osc/sprp/multipush1/*/*"
    puts res #to show what the parse function returns
    puts "The switch pushed was in column ",res[3],"and row ",res[4]
  end
end
In a midi situation you might try:
live_loop :miditest do
  b = sync "/midi/*/*/*/note_on"
  if b[0]>1
    res= parse_sync_address "/midi/*/*/*/*"
    puts res #to show what the parse function returns
  end
end
Having got this parse function working, I played around with it using the matrix to drive note generation in Sonic Pi. At that point it occurred to me that it would be nice to try and develop a fully fledged interface to input note information to Sonic Pi and gradually this project developed into its final form which includes the following features.
- An 8×8 matrix of push buttons which provide note input.
- Keyboard layout similar to Ableton Push2, which makes it easier to input tunes. (More detail later)
- The ability to choose keys C,D,E,F,G,A and B major and minor.
- A choice of two percussive synths (piano and pluck)
- The ability to record in real time the note input, the key input and the synth selection, which can then all be replaced.
- When playing back a choice of three tempo settings is available. Slow Medium and Fast. Paying back at Slow plays back at the same rate as the recording was made.
- The inclusion of a metronome, which can be switched on or off and set to two different rates. This aids the accurate placement of notes when entering them in real time during a recording.
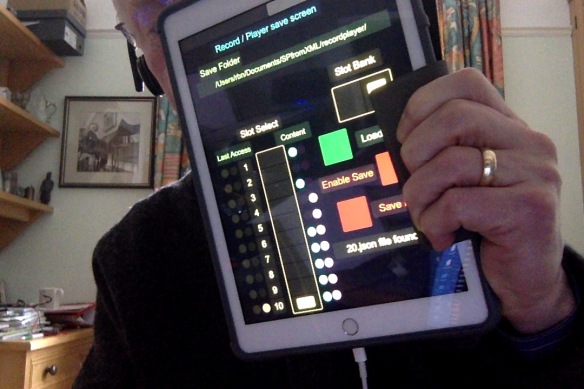
- Using a second “page” of TouchOSC the ability to save and retrieve up to 20 different recordings.The screen gives an indication of which slots are filled, and which slot is currently loaded.
- A further feature is that you can play back a recording AND play a second part at the same time. Thus you could play a two part round, or add a harmony part to a tune. Although the program itself cannot record the result, because it is all played by Sonic Pi, you can use the built in audio recorder to record the resultant audio.
- During playback you can switch off the LEDs from illuminating the keys as the notes play. This gives both a decreased load on the program, and is less confusing if you are trying to play a second part at the same time.
The two screen “pages” of the TouchOSC interface are pictured below, before the Sonic Pi programs are running. Because the program is quite long it is necessary to split it into two sections, each running in a separate buffer on Sonic Pi.Also, for this reason I have not included many comments in the program which I usually like to do. I decided to design the layouts on an iPhone sized template, so that they could be used on a phone, even though rather small. However, it scales up to work on a tablet screen, and I would anticipate that this will get greater use. The program that drives the first screen is called spRecordPlayer.rb and the program for the second screen is called spRecordPlayerSaver.rb :


When run the recordplayerServer program ichanges the second screen to:

Note this shows some of the file locations as populated with files containing music data. A fresh installation will not show any LEDs lit on the right hand side of the slot selector.
When the recordplayer program is run it changes the first screen to:
 Notice here the blue LEDS indication the tonic key locations on the matrix.
The logical split is to have the code associated with each of the two TouchOSC “pages” in its own separate buffer. The only link between them is the ability to pass the information stored for a recorded piece between them in either direction, by means of variables stored in the time state. The piece data is stored in 8 lists or arrays. One pair stores the coordinates of a pushed note button plus the time at which it was pushed. A second pair store the current musical Key selection and the time at which it was changed. A third pair store the changes (and times of change) of the major/minor key selector. The final pair store the allocations of the synth (piano or pluck) and the times at which these are changed. When a fresh recording is started these lists are all reset. When a recording has finished, the contents are used to replay the information through Sonic Pi. The arrays are stored in the time state, and are available for replay, even if the programs are re-run, until a fresh recording is made, or Sonic Pi is quit. However, to keep a permanent copy which can be reloaded on a subsequent occasion, the second TouchOSC page is used. This enables you to save or load the data to or from a series of 20 json format files. These are a defined format of text file which can store the contents of the eight arrays, which are held in a Ruby hash structure.
On the screen there is a slot selector which can access one of 10 slots. In addition there is a Slot Bank selector which can select two different banks of slots, giving a total of 20 selectable destinations where pieces can have their data saved. The destination for the json files is displayed on the screen and is set in the program. They are named 1.json up to 20.json. To save the current data to a file you select the destination slot and slot bank, them press an enable save button which remains active for about a second. During that time you press the Save File button. To load a file, you select the required slot and slot bank then press the green Load File button. A series of indicators are on each side fo the Slot Selector. They indicate on the left the last slot loaded since the program was started, and on the right slots which have a non-empty data file. If a file is missing when you try and load it a warning sound is played, and a message is displayed on the screen. In that case, you first have to create a file in the slot which you can do by saving an empty recording to the slot. This should be done the first time the program is run to create 20 empty formatted json files.
Returning now to the main TouchOSC “page”, we need to describe the matrix keyboard layout in more detail. As already mentioned this is similar to the layout used by Ableton in their push2 device. The 8×8 layout is addressed by coordinates from column1 row 1 or c1r1 top left down to column 8 row 8 c8r8 bottom right. However this is mapped to play notes so that the lowest pitch is bottom left and the highest top right. Also some notes are repeated at more than one position on the layout. To facilitate finding your way around, the tonic note (main note) for each key is highlighted with a blue LED. If you start playing bottom right c1r8 then this key is mapped to Sonic Pi :c2 when playing in the key of C (major or minor). As you move along the bottom row, the pitch increases as you might expect until key c8r8 which plays Sonic Pi note :c3. However if you move up a row then key c1r7 does NOT play :d3 but instead duplicates key c4r8 and they both play Sonic Pi :f2.
Effectively as you move up the screen each row starts an interval of one fourth above the note below it. Thus if you want to play a sequence of notes an octave apart you could press c1r8, c2r6, c3r4, c4r4 and finally c8r1 giving a total octave range of four octaves plus one note. This may seem very odd to start with, but you quickly realise that it is a very good layout and facilitates for example playing a quick scale, or arpeggios. For a C scale you can play the first three notes on the bottom row, followed by the first three nots on row 7, then the first three note on row 6 and so on. To aid moving quickly around the keyboard when you are playing, when a key is pressed it not only illuminates that key, but also any other key which plays the same pitch. Depending on where you are on the keyboard, this may be no further keys (eg for c1r8 or c8r1), one further key eg for c4r8 which also illuminates c1r7, or two further keys eg for c5r7 which also illuminates c2r6 and c8r8.
The other keys on the keyboard give some indication of what they do, but in a limited space on the screen it is not possible to give a full label describing their function. Starting at the top, the P key will initiate playback of the current piece in memory. Pressing it again will stop playback. The key R top right wipes out the data currently in memory and starts a new recording. Thereafter, until it is pressed again to stop recording all keystrokes on the matrix and the key signature and the major/minor key are recorded in real time. T he keys on the righthand side in red marked F, M and S with pb in yellow below adjust the playback tempo, setting it to Slow Medium or Fast. These enable you to record something slowly and then subsequently play it back at a faster tempo. The purple keys F and S with met in yellow below adjust the speed setting for the metronome to Fast or Slow. The metronome is turned on and off by the purple key met on at the bottom left of the screen. The strip of keys marked C D E F G A and B set the current key signature, which can be supplemented by the key marked major, which when pressed changes to minor, and then back again when pressed once more. This effectively sets the note for the bottom left matrix key from Sonic Pi :C2 through to :B2. The key marked led pb on enables the matrix keys to follow what is being heard when playback is selected. During playback the key pressed for each note is briefly highlighted. This can be switched off so that if you are trying to add a second part during playback you are not confused by other keys flashing Sometimes the flashing may not keep up for fast pieces and it can reduce the load if this is switched off. Finally the Green selector marked piano and pluck switches between these two synths. It will override the current selection, even during playback until a further input is provided from the playback stream. The same is true of key signatures.
So that completes a description of the program and how it works. I do not intend to go through the programs line by line but leave you to examine the code yourself if you are interested.
You can download the code, and the template for the TouchOSC screens from this link
You can watch a video showing the operation of the program here.
