 It is six months since the last release of Sonic Pi, and you may be forgiven in wondering what has been going on. The answer is that over this Sam Aaron has been working extremely hard to bring midi connectivity to Sonic Pi, as well as enabling the program to receive audio input from external sources. This may sound fairly modest and not a big deal, but it has involved a huge amount of work to ensure that midi input and output are fully synced with Sonic Pi’s extremely accurate timing system. During the same period Sam’s funding to develop Sonic Pi has reduced and comes to an end at Christmas, making it difficult for him to spend the time needed to develop the application further.
The initial release of version 3.0 is for the Mac, and set up details in this article are specific to that version.
The image below shows the new Pro Icon Set (optional) and the new IO tab in the Preference Panel. The new version, was developed as version 2.12.0 then 2.12.0-midi-alpha1 to 8 but because of the major changes involved justified a name bump to version 3.0, named “IO” (input Output). Sonic Pi was developed as a platform where children could be introduced to coding via the medium of music. It became a hit in many schools, but led to many requests to enable it to accept external input or to be able to give output to drive external synths or music modules. The established mechanism over the years (since the 70s) has been to use midi protocols to do this, although of its own it can be a bit limiting and more modern music communication methods also use OSC short for Open Sound Control. In fact Sonic Pi has used always OSC internally to allow the various parts: the GUI (Graphics User Interface) Ruby Server and scsynth (the Super Collider synth module) to communicate. Sam collaborated with Joe Armstrong to use the language Erlang, which is designed for situations where concurrency and the passing of large numbers of messages are concerned, and so it was ideal to handle the scheduling of midi information into Sonic Pi. This was helped by the development of two small applications by Luis Lloret to convert midi messages to osc messages (as they came into Sonic Pi, and osc message to midi information as it left sonic pi for the outside world.
This image of the info screen lists some of new new facilities in Sonic Pi 3.0
Lets look first at midi. Of course for this to work, you need to have either something which can produce midi signals which can be sent to Sonic Pi, or something which can receive and react to them. This will of course cost money if you use hardware devices, but you can try out midi on a Mac, (and on other platforms with appropriate software), by using suitable software programs loaded on to your Mac. One free program that I have used is MuseScore2 which you can download here Alternatively you may have GarageBand on your Mac. This can be used both to receive midi from Sonic Pi to be played using software instruments within MuseScore, or to play a midi file which can be received by Sonic Pi and played using synths within Sonic Pi. Another software synth which can be used is Helm which is donate-ware, i.e. you contribute what you think it is worth. here Finally you can download a free virtual keyboard called vmpk from here It is a bit old and slightly flaky on Mac OS Sierra but it does work, although it can take a little playing around with to get everything right. The key is the midi connections entry on the Edit Menu. You can configure it to act as a player using the built in fluid synth software synthesiser, or to act as a simple keyboard. Picture below shows it set up as a player. Disable Midi In and change Midi Out to CoreMidi SonicPi Connect to use as a keyboard input.
All the above software is effectively free (If you are miserly and don’t want to donate to helm). However on the Mac there are two pieces of software which I would recommend considering to buy. The first is an excellent little midi player called MidiPlayer X  which is available on the App Store for a very modest £1.99 so it doesn’t break the bank. You can drag and drop midi files on to it and either play them in the built in sound module, or you can select any available midi device from a drop down menu. You can loop the file or build a playlist and also alter the tempo and selectively mute channels. I have used it a lot with the development version of Sonic Pi over the last few months. The second item, TouchOSC lets you interact with Sonic Pi from an iPhone or iPad, and there is also an Android version, although I have not tried that. I have built several quite substantial projects using this, and utilising not just the midi connectivity of Sonic Pi 3.0 but also its OSC external messaging facilities. These have included a substantial midi player controller project, that lets you choose synths, envelopes, volumes, pan settings etc of Sonic Pi utilising it as a 16 track midi player, with built in support for a full GM midi drumkit as well. Another simpler project creates a virtual midi keyboard, (editor build screen shown below)
 with selection of sustain times and choice of synth for Sonic Pi. A third project modified the Hexome Project published in the MagPi Issue 58 to work with Sonic Pi 3.0 This software is a little more expensive at £4.99 but still pretty cheap, although you do need a suitable device from which to run it. Now that Sonic Pi 3.0 is released I hope to publish the software for these, but you can already see development videos of them on my youtube channel here
In all cases, one further vital link is required. Midi signals are passed between devices. Initially these were physical boxes like keyboards, and synthesiser modules and they were connected together by physical 5 pin din leads. When computers came on the scene, external devices started to use usb leads as a means of connection, and if you plug such a device like my small M_Audio Oxygen8 keyboard into the Mac it is recognised as a midi input device. However programs like Sonic Pi have no physical presence, and so the Mac lets you create virtual midi devices which let programs like Sonic Pi or Garage Band talk to Sonic Pi via midi.
The key program to set this up on the mac is called Audio Midi Setup and it can be found inside the Utilities folder in your main Applications folder. Start up Audio Midi Setup and select Show Midi Studio from the View Menu. (if it says Hide Midi Studio the window should already be visible). (Double click the image below to expand it). Find the icon entitled IAC Driver and double click to open it. If you see a flag saying More information click on it too. (Double click the image below to expand it).
 Now find the entry IAC Bus 1 and click and rename it to something more memorable. I called mine SonicPi. I also renamed the Port as Connect Finally click the Device is online flag, and the Apply Button. (See the image below).
You can of course use any names you like, or leave it as the default setting, IAC_Driver with the default port name, IAC Bus 1 Note: Sonic Pi converts all Midi Dev names to lowercase, and replaces any spaces with _ characters, to make life a little less confusing.
If you launch Sonic Pi 3.0 and select IO the new tab on the preferences window, you should see sonicpi_connect listed under the MIDI inputs and MIDI outputs sections.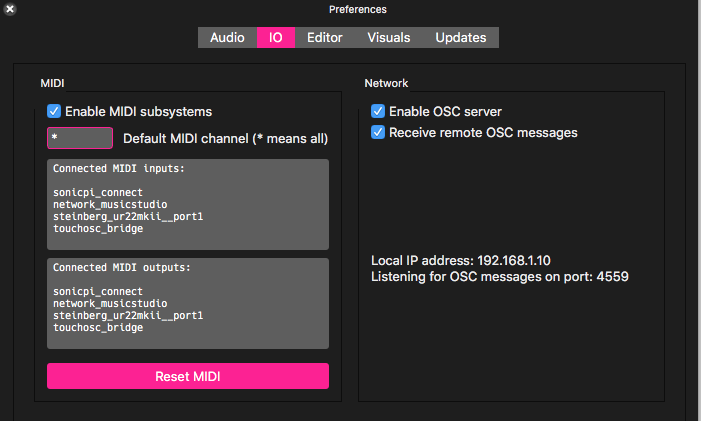 Now launch a suitable program to receive midi from Sonic Pi. I tried GarageBand and MuseScore2. For GarageBand, open the application and choose a new empty project.
 Select Software Instrument to insert one instrument, set by default to Classic Electric Piano.
 In Sonic Pi type
midi 72
Run the program, and all being well you should here a piano note played in GarageBand. Sam has achieved his aim of producing something that an 8 year old can do!
You can change the instrument sound in Garage Band. Use the library on the left. here a marimba is chosen.
To do the same thing in MuseScore2, launch that app. (nb an updated version was released very recently) Close the Score Centre popup window. Select the preferences on the MuseScore Menu, select theNoteInput tab and make sure enable midi input is ticked.
 Then select the I/O tab and select the SonicPi connect midi input as shown. Note the message about restarting MuseScore. Click OK.
 Restart MuseScore, again closing the Score Centre popup window and then you can run the midi command from Sonic Pi again. All being well you should here a piano note being played. If not, check that the midi din-plug icon at the top MuseScore window is highlighted (i.e. active) and try again. You can also change the sound on MuseScore from the Mixer Window on the View Menu (NB NOT the Instruments entry on the Edit Menu. That is for something else. The picture below shows a Glockenspiel sound being selected for the Piano output.
 You can even have MuseScore and GarageBand being played at the same time by Sonic Pi of both are set up together as described!
You can then try a slightly more sophisticated program to play notes chosen at random from a scale.
live_loop :midi_out do
  n=scale(:c4,:major).choose
  midi n,sustain: 0.2
  sleep 0.2
end
Try experimenting by altering changing the sleep and sustain times. You could also choose a different scale, or maybe transpose by using midi n+3 instead of midi n
You can add further control by using the option vel_f: this is followed by a number in the range 0->1 which specifies the velocity with which a standard midi keyboard note is pressed i.e. the volume. Try changing the line to
midi n,sustain: 0.2,vel_f: 0.3
The instrument you hear is entirely controlled by the receiving program. In GarageBand you can choose a different instrument from those available on the library. e.g. a bright punchy synth, or in MuseScore2 open the mixer on the View Menu and choose say a Clavinet from the dropdown list as illustrated above,
So much for midi output. What about input? To handle this Sonic Pi utilises its cue and sync system. The cues are provided by incoming midi events, such as when a note is received from a connected midi device. The midi “cues” can be generated by various actions. When a note turns on and when it turns off again. Also midi control signals can cause events. These might be used to change a synth for example. Another type of event is generated by a midi pitch-bend wheel. All of these and more can be catered for in Sonic Pi. (They can also be sent out from Sonic Pi as well as the simple midi command used to play notes, which in fact automatically uses both note_on and note_off events). The code below will receive midi note_on and note_off events (In fact note_off events can also be interpreted as note_on events with zero volume).
live_loop :midi_input do
  use_real_time #gives fast response by overriding the sched ahead time
  use_synth :tri
  #wait for a note_on event from midi source sonicpi_connect
  b = sync "/midi/sonicpi_connect/*/*/note_on"
  #b is a list with two entries.
  #The note value in b[0] and the velocity value  in b[1]
  puts b
  #b[1] has range 0-127. Convert to float
  #then scale it to range 0-1 by dividing by 127
  play b[0],release: 0.2,amp: b[1].to_f/127 #play the note
end

#you can use two variables say b,c to get the information from the sync
#b,c = sync "/midi/sonicpi_connect/*/*/note_on"
#if you prefer to do so, Amend the program appropriately
To use this we can produce a midi input from the virtual keyboard. However first, we can check it out even more quickly, by combining it with our midi send program recently discussed. That gives us this total program.
live_loop :midi_out do
  n=scale(:c4,:major).choose
  v=0.7
  midi n,sustain: 0.2,vel_f: v,port: "sonicpi_connect"
  sleep 0.2
end

live_loop :midi_input do
  use_real_time #gives fast response by overriding the sched ahead time
  use_synth :tri
  #wait for a note_on event from midi source sonicpi_connect
  b = sync "/midi/sonicpi_connect/*/*/note_on"
  #b is a list with two entries.
  #The note value in b[0] and the velocity value  in b[1]
  puts b
  #b[1] has range 0-127. Convert to float
  #then scale it to range 0-1 by dividing by 127
  play b[0],release: 0.2,amp: b[1].to_f/127 #play the note
end
I have slightly altered the first part of the program to include a velocity setting, and I’ve also explicitly named the midi port to be used, rather than all of the available ones. Try altering the v setting say to 0.3 and press run again. Or perhaps put n+12 in the midi send line in the first loop and go up an octave. Note if you still have GarageBand and or MuseScore running then they will play along too! You can mute them using the mute icon beside the instrument name in GB and by clicking the midi din icon in MuseScore to toggle off midi input.
To try the keyboard first comment out the first live loop so it doesn’t send any midi. Theb launch vmpk. Go to the Edit Menu and select Midi Connections. Make sure that midi input is not ticked. Select CoreMID for the Midi OUT Driver and choose SonicPi Connect for the Output Midi Connection, (as shown in the screen shots above) Because the keyboard program generates further midi connections, you need to update Sonic Pi. In the Sonic Pi Preferences I/O tab click the Reset MIDI button. This takes a few seconds, but eventually you will see the connection lists updated: there will be some vmkb entries, although we are not using them here. Now run the Sonic Pi program (with the first live_loop commented out) and play the virtual keyboard. You should hear the notes you click with the mouse. Also in the vmpk preferences under the vmpk menu you can enable your mac (typing) keyboard to activate note input.
  With this selected, you can type the appropriate keys and play Sonic Pi, when the vmkb program is selected. Note that when you quit the vmkb program, it will remove its virtual midi devices, and you will have to reset the Sonic Pi midi setup to keep it going using the Reset MIDI button.
Not only does Sonic Pi 3.0 add midi in and out, it also enables you to add audio input directly into Sonic Pi, where you can modify it by applying fx like :reverb, or :flanger. To do this you WILL need some additional hardware to feed audio in. I use a Steinberg UR22 MkII audio/midi interface, which gives me two audio in/out channels as well as allowing a hardware midi in/out connection which can be connected to an external midi device such as a keyboard or music module. I have an old Korg X5DR which works with this. However, you CAN try it out using input from the built in microphone on a Mac. Best if you have a set of headphones to listen so that you don’t get feedback! To set things up you use our old friend Audio MIDI Setup again. This time you want to look at the Audio Devices window on the View Menu. Make sure that Built in Microphone is used as the default Input device. (That WILL be the case if you don’t have any additional audio devices connected to your computer). Note if you change the audio selected devices, then Sonic Pi will NOT realise any changes have been made until you restart it. Unlike the midi changes, there is not a reset button to accommodate this, as it happens less frequently! Restart Sonic Pi if you have changed the settings. Now select an empty Sonic Pi 3.0 buffer and type in:
live_audio :mic,amp: 5
Put headphones on, connected to your Mac, and press run. You should be able to hear yourself, and will also see a trace on the Scope if you turn that on in Sonic Pi. You may have to get quite close to the mike to get sufficient input. If it is very quiet, try changing the amp: 5 to amp: 10. Now amend the program as shown below, and rerun.
with_fx :compressor do
 with_fx :reverb,room: 1 do
 live_audio :mic
 end
end
sleep 10
live_audio :mic,:stop #turns off the live_audio feed
#program still running here. Press stop to finish
Here we put in some reverb and also take out the amplification of the live_audio input, but instead put the whole section inside an fx :compressor to boost the overall output. You can already see from this the potential of live_audio if you add the hardware to access other external audio sources. If it is too loud, you can add :amp 0.5 in the compressor line. giving with_fx :compressor, amp: 0.5 do At the end I show a program which sends midi out to an external synth, which sends audio back via live audio to Sonic Pi 3.0 Also incorporated is a synchronised rhythm drum track generated by Sonic Pi. The volume fades up and down, controlled by an at statement also utilising the new .scale method applicable to rings, which scales the values within a ring.
`The final major addition to Sonic Pi 3.0 is the ability to record a buffer. This means that it is possible to record some live_audio input and store it and then reuse it as part of a running program for example to produce a loop. I have already published a video example of this where I record 4 separate buffers with different versions of Frere Jaques, and then use Sonic Pi 3.0 to play them as a round, and then manipulate them, playing the round faster and faster.
Here we’ll try something a bit simpler. Amend the program above by adding commands to record up to 16 beats worth of sound.
with_fx :record,buffer: buffer[:micbuffer,16] do
  with_fx :compressor do
    with_fx :reverb,room: 1 do
      live_audio :mic
    end
   end
end
at 16 do #stop the live audio feed when finished recording
  live_audio :mic,:stop
end
#press stop to finish the program
The extra wrapper around the original program uses the new with_fx :record effect. This uses as a destination the buffer described at the end of the first line. The buffer is named :micbuffer, and the 32 specifies its duration in beats. by default it will be 8 beats long unless specified otherwise. Run the program and record a session of speech. At the normal bpm setting of 60 this can be up to 16 seconds long. If bpm is set to 120 it will only be 16 seconds long. When you have completed the recording, press stop then comment out this section and add at the bottom:
sample buffer[:micbuffer,16]
Run the program again and you should hear your speech back again.
You can have fun with it now. What about Mickey Mouse? Try:_
sample buffer[:micbuffer,16],rpitch: 12
This puts it up an octave and plays twice as fast. One word of warning. Do not change the bpm when you have a recorded buffer or it will reconfigure it for the new bpm value, (as it will have a different duration) and destroy its contents in the process. I had to take account of this when I used the record technique to produce a round version of Freer Jacques using 4 recorded buffers. here
The final new introduction I want to mention is the easy availability of OSC messaging. Sonic Pi 2.11 had the ability to receive OSC based cues, although it wasn’t documented, and the syntax was different. In Sonic Pi 3.0 it is a fully functional feature, as well as the ability to send OSC messages, crucially not only to other programs running on your computer, but also to external computers and programs via network connections. There is the facility to enable or disable this feature on the new IO prefs tab, as it can potentially be a security risk. The facility is particularly useful for interacting with programs such as TouchOSC, which, as the name implies is designed to use bi-directional OSC messaging, although it can also send midi messages as well. To use OSC you need a program that can send and a program that can receive them. There are OSC monitors that can be built or used, but they can require a bit of setting up, so to keep things simple we will use Sonic Pi to send OSC messages to itself.
In a new window type
use_osc "localhost",4559
osc "/hello/play",:c4,1,0.5,:tri

b = sync "/osc/hello/play"
puts b
use_synth b[3]
play b[0],amp: b[1],sustain: b[2],release: 0
#if you prefer it, use four separate variables to get the data
when you run this, you should hear the note :c4 played with a :tri synth, with a duration of 0.5 seconds and an amplitude of 1. These values are passed as the data associated with the address /hello/play Sonic Pi prepends the /osc to distinguish the source, and the sync command is triggered by the arrival of the osc message. if you look at the output of the puts b line you will see that the data is passed in a list which is assigned to b (the variable we specified) and then various bits can be accessed using b[0], b[1] etc… Here is the version using separate variables to extract the received data:
use_osc "localhost",4559
osc "/hello/play",:c4,1,0.5,:tri

n,a,d,s = sync "/osc/hello/play"
use_synth s
play n,amp: a,sustain: d,release: 0
Now I amplify this to play my old favourite Frere Jaques entirely with OSC messages.
#Frere Jqeus played on Sonic Pi 3.0 entirely using OSC messages
use_osc "localhost",4559
t=180
set :tempo,t #use set to store values that will be passed to live_loops
use_bpm t

p=0.2;m=0.5;f=1 # volume settings
#store data using set function so that it can be retrieved in live_loops
set :notes,(ring :c4,:d4,:e4,:c4,:c4,:d4,:e4,:c4,:e4,:f4,:g4,:e4,:f4,:g4,:g4,:a4,:g4,:f4,:e4,:c4,:g4,:a4,:g4,:f4,:e4,:c4,:c4,:g3,:c4,:c4,:g3,:c4)
set :durations,(ring 1,1,1,1,1,1,1,1 ,1,1,2,1,1,2, 0.5,0.5,0.5,0.5,1,1,0.5,0.5,0.5,0.5,1,1, 1,1,2,1,1,2)
set :vols,(ring p,p,m,p,p,p,m,p,p,m,f,p,m,f,m,m,m,m,f,m,m,m,m,m,f,m,f,f,f,f,f,f)
set :synths,(ring :tri,:saw,:fm,:tb303)

live_loop :playosc do # this loop plays the received osc data
  use_real_time
  n,d,v,s,tempo= sync "/osc/hello/play" #retrieve data from OSC message

  use_bpm tempo
  use_synth s
  play n,amp: v,sustain: d*0.9,release: d*0.1
end

live_loop :sendosc do
  #retrieve data from main program using get functions
  s=get(:synths).tick
  notes=get(:notes)
  durations=get(:durations)
  vols=get(:vols)
  tempo=get(:tempo)
  use_bpm tempo #set local tempo for this loop
  notes.zip(durations,vols).each do |n,d,v|
    osc "/hello/play",n,d,v,s,tempo #send OSC message with note data
    sleep d
  end
end
The tune, note durations and volumes for each note are held in three rings. The data is sent to the live_loop that will send it using OSC messages using another new feature in Sonic Pi 3. The set and get functions. Previously I, for one, have just declared variables in the main program, and used them inside live loops. Whilst this will work most of the time, it is bad practice, as you might get two live_loops trying to alter variables at the same time and causing confusion. Using the set and get functions keeps things in order. See section 10.1 of the Sonic Pi built in tutorial for more detail on this. Somewhat oddly the two live loops to send and receive the data via OSC messages are presented in what may seem the wrong order, but this will make sense a bit later on. The Second live loop :sendosc first chooses a different synth to be used on each iteration using a tick to sequence through a list of synths (which you can alter if you like) . Then I use one of my favourite constructs in Ruby which enables you to iterate through two or more (in this case three) lists which are zipped together. The way it works is that on the first iteration n,d and v will hold the first values in the three rings :c4, 1 and 0.2 On the next iteration they hold the second set of values and so on. These are then combined in an OSC message. This has two parts. First an address, which can be anything you like, but each section must be preceded by a / Here we have /hello/play but we could equally have /hi/dothis as long as we look for the right address when we try and receive it. This is followed by a list of data, which can be numbers, strings or symbols. In this case we have four items which are sent. The destination is specified in the separate use_osc command, here giving use_osc “localhost”,4559 This specifies that the local machine (ie the one we are using) will receive the message on port 4559. (You will see this port specified in the new I/O prefs. Sonic Pi is set up to monitor this port. We sleep for the duration of the note and then the next OSC message is sent.
Turning to the receiving live_loop :playosc this waits for sync events to occur with the format “/osc/hello/play” Remember that Sonic Pi prepends the /osc to signify where the sync event has originated from. as described in the first OSC program the data is extracted to the variables n,d,v,s and tempo and the various parts are then used to specify the synth, bpm note amp: and duration settings to use. In this case an envelope is used with separate sustain and release times. We don’t need to specify the time between notes as this is taken care of by the sync, which depends on the time between the OSC messages set by the sending loop. The received tempo is used to set the local bpm, so the timing of the note durations are interpreted correctly. Hopefully when you run this program it will play Frere Jaques for you continuously, cycling through the synths specified.
Now for more of a good thing!. Add a third loop with a delay of 8 beats to the end of the program
live_loop :sendosc2,delay: 8 do
  #retrieve data from main program using get functions
  s=get(:synths).tick
  notes=get(:notes)
  durations=get(:durations)
  vols=get(:vols)
  tempo=get(:tempo)
  use_bpm tempo #set local tempo for this loop
  notes.zip(durations,vols).each do |n,d,v|
    osc "/hello/play",n,d,v,s,tempo #send OSC message with note data
    sleep d
  end
end
This is identical to the other send program, except in name and in the delay: 8 in the first line which means that it starts 8 beats after the other live_loops. If you now play the program again, both sendosc loops will broadcast the tune, but the second one delayed by the time for the first two lines of Frere Jaques to play. Because they both send to the same OSC address their information streams will both be picked up and played by the :playosc loop.
Finally, if you are lucky enough to have access to a second machine with Sonic Pi 3 on it, you can copy the live_loop :playosc code to the second machine, and adjust the main program to send OSC messages to it and it will join in, fully synchronised. I’ve just had two Macs and a Raspberry Pi running my initial build of Sonic Pi 3 all playing synchronised together by OSC messages. Sounds Great. The change you have to make to the main program, is to the osc message lines. An example is shown below, for a machine on ip address 192.168.1.128:
osc "/hello/play",n,d,v,s,tempo #sends to local machine
osc_send "192.168.1.128",4559,"/hello/play",n,d,v,s,tempo #sends to remote machine
You can add a third machine by adding a third live_loop :oscsend3,delay: 16 but otherwise the same as the other two send loops. This could use the appropriate address for that machine. If you want you can use one send loop and put two or more appropriate or osc_send commands one after the other, so that they play the same notes together.
Here is a link to tweet video showing an early (naughty) version of the program in action, which didn’t use set and get to transfer the note information!
Finally I promised earlier to include a program incorporating midi, live audio and a locally generated rhythm track all nicely synchronised together.
#Sonic Pi 3.0 Example showing midi out, live_audio in
#synchronised drum track and use of at to control volumes
#written by Robin Newman, July 2017
use_debug false
use_osc_logging false
use_midi_logging false
use_bpm 100
#st up rhythm tracks and volumes 0->9
set :bass_rhythm,ring(9, 0, 9, 0,  0, 0, 0, 0,  9, 0, 0, 3,  0, 0, 0, 0)
set :snare_rhythm,ring(0, 0, 0, 0,  9, 0, 0, 2,  0, 1, 0, 0,  9, 0, 0, 1)
set :hat_rhythm,ring(5, 0, 5, 0,  5, 0, 5, 0,  5, 0, 5, 0,  5, 0, 5, 0)

with_fx :level do |v|
  control v,amp: 0 #start at 0 volume
  sleep 0.05 #allow amp value to settle without clicks
  at [1,26],[1,0] do |n|
    control v,amp: n,amp_slide: 25 #fade in and out over 25 beats each
  end


  live_loop :drums do
    sample :drum_bass_hard, amp: 0.1*get(:bass_rhythm).tick
    sample :drum_snare_hard, amp: 0.1*get(:snare_rhythm).look
    sample :drum_cymbal_closed,amp: 0.1*get(:hat_rhythm).look
    sleep 0.2
    stop if look==249
  end

  #audio input section

  with_fx :compressor, pre_amp: 3,amp: 4 do
    #audio from helm synth fed back using loopback utility
    live_audio :helm_synth,stereo: true #audio from CM bells selected on helm synth
  end

end #fx_level

at 30 do  #stop audio input at the end
  live_audio :korg,:stop
end

#send out midi note to play (sent to helm synth CM bells)
live_loop :midi_out,  sync: :drums do
  tick
  n=scale(:c4,:minor_pentatonic).choose
  vel=0.7
  midi n,sustain: 0.1,vel_f: vel,port: "sonicpi_connect",channel: 1
  sleep 0.2
  stop if look==249
end
This program requires an external synth (I used the helm software synth and fed the midi to it via the sonicpi_connect interface we set up earlier. I used the utility LoopBack (freee to try out) to set up an audio input connection, and set this as the default audio input in Audio MIDI setup so that Sonic Pi selected this (rather than the built-in microphone that we used before) when it started. Remember you need to restart Sonic Pi if you want to alter either where its sound output is fed OR where it can receive audio input from. It always uses the system selected audio devices active when it starts up.
The program has a live loop each playing percussion samples. These are controlled by rings containing the volume setting for each iteration of the loops which are synced together. There is a live_loop which sends midi notes out to the helm synth, which is also synced to the percussion loops. The audio output of the Helm is fed back to Sonic Pi as live_audio via the LoopBack interface. Also of interest is the use of the at command which fades in the percussion and live_audio volume by controlling a with_fx :level wrapper placed around the :drums live_loop and the live_audio inputs. When the program is run, The total sound output builds from zero to a maximum, and it is then faded out again, with the loops being stopped at an appropriate point by counting the elapsed ticks in each case.
You will have to adjust the settings in the program to suit any external midi/audio interface that you may have. Even if you can’t run it, some of the techniques employed may be useful to you.
The FrereJaques program and the Helm with percussion program are also on my gist site here and here and you can hear their output on sound cloud here and here
Well this has been quite a quick gallop through what Sonic Pi 3.0 has to offer. I hope you find some of the examples useful in getting you going. I think that the program adds fantastic new opportunities to Sonic Pi, and Sam is to be congratulated on the amazing job he has done. I know that it has involved a huge effort, many long nights and frustrations, and that few appreciate just what has been involved. If you like Sonic Pi and use it, and particularly if you want to see it developed further consider supporting Sam via the patreon site on https://patreon.com/samaaron If enough people sponsor a modest monthly amount then the funds can be gained to enable him to devote the time to this mammoth job that it needs. As a supporter you will also gain access to interim development releases of Sonic Pi along the way.
I have quite a number of published resources for Sonic Pi produced over the last few years. This blog is one. Also available are sound file on soundcloud here here and here
Many of these have associated software on my gist site I also publish videos on youtube
Now that Sonic PI 3.0 is released, I have quite a bit of resource material which makes use of it, so watch this space for further articles on its great capabilities
twitter address @rbnman

Thanks so much for writing this!
Glad you find it useful
This was extremely helpful, thanks a lot! (This might be the wrong place to be asking this but ) I’m struggling to figure out how to send osc messages to sonic pi, from a node server and/or python, where I can specify the synth. When a send a message with a variable “:square”, it seems to be read as a string and doesn’t work.
You can use the command
use_synth "square"and that will work
or try the program
use_osc "localhost",4559
osc "/send/synth",:square
live_loop :getsynth do
b = sync "/osc/send/synth"
puts b[0]
use_synth b[0]
use_synth "tri"
play 60,release: 1
sleep 1
play 72,release: 1
end
Hi Robin,
Do you know of a way to detect the volume of the signal coming through live_audio?
On another note, thx for all the great work & tutorials.
Crazy educational stuff here!
Not sure that this can be done directly. However you can control the volume of the incoming signal. In fact I have been playing with TouchOSC and using that to control various aspects of a live_audio signal using OSC messages to adjust the settings of fx wrappers around the live_audio input. One of these could be a simple with_fx :level command, and you can use the OSC message to control what this level should be. I will add a post about this on the in-thread.sonic-pi.net site soon.